How to create a classroom wiki
What is a wiki?
A wiki allows a group of people to collaboratively develop a Web site with no prior knowledge or experience of website design.
Wikis are a great places for students to collaborate on projects. Each student could have their own page on which they can be an 'expert' on a subject. You could have a page where students write book reviews, create a classroom newsletter, create an online dictionary of key words, list ingredients / apparatus for the next lesson or just create a place to collect links and resources for a particular topic or lesson.
Popular education wiki creation sites include wikispaces (www.wikispaces.com) and PBWorks (www.pbworks.com)
Educational value of Wikis
Wikis encourage group social interaction and collaboration and support learning beyond the limits of the classroom and classroom activities.
Creating a classroom wiki with wikispaces
What is wikispaces?
Wikispaces - www.wikispaces.com - is an online hosting service (sometimes called a ‘Wiki Farm’). It features an easy to use interface to create your wiki pages and also includes widgets to allow you to embed content such as YouTube videos and surveys into your wiki site. This means you do not need any specialist skills to create your wiki site. It also means that it is easy for your students to create a wiki too. Wikispaces is great for educational use, especially as it does not place ads on your wiki site like other online web creation tools, and best of all, it’s FREE for students and teachers!
Benefits of a Wikispaces education account:
- Full privacy : you decide who can see you and your student’s wikis
- Free from advertising : Wikispaces does not place ads on educational wikis. (The free “public” and “protected” versions of wikispaces have ads on the side and this may violate your board’s internet policy.)
- Unlimited use : as many users, pages, edits, and files, as you like, no limits
- Fully customisable
How does Wikispaces Classroom differ from other wiki creation tools?
Wikispaces Classroom builds on the collaborative editing features of a wiki but includes some additional functionality to support classroom use, features such as social interaction and formative assessment.
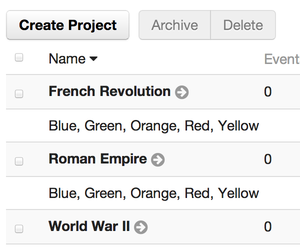
One of the most welcome additions to wikispaces is the ability to set up projects and assign teams (great for PBL). Students can be assigned to teams by either dragging and dropping them to a pre-defined team or by uploading them via a .csv file. Students can also be assigned to a team using the built in random tool. Once assigned to a team, each student will have their own space to work in.
Wikispaces Classroom allows you to create projects, define teams, assign students and manage them all through successful completion of their projects.
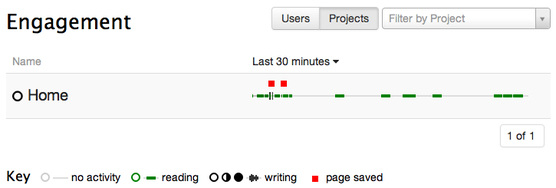
Another noteworthy addition is the ability to monitor students’ contributions using the built in formative assessment tool. Teachers can use the tool to monitor how often a student has read, edited or saved a page. At present, statistics are only limited to the last 30 minutes (update pending) however, over the space of a lesson, the tool can provide the teacher with an instant overview of each student’s contribution.
Wikispaces Classroom allows you to monitor student engagement in real-time.
The final significant addition is the news feed option. With news feeds, wikispaces classroom provides a safe social networking environment for your classroom.
News feeds are great for starting discussions and socratic debates or just for introducing a new topic.
Getting Started
Creating a classroom wiki is really easy however, before you start, you will first need to create a free education account. Visit: http://www.wikispaces.com/content/classroom to get started.
Step 1 – Signing-up
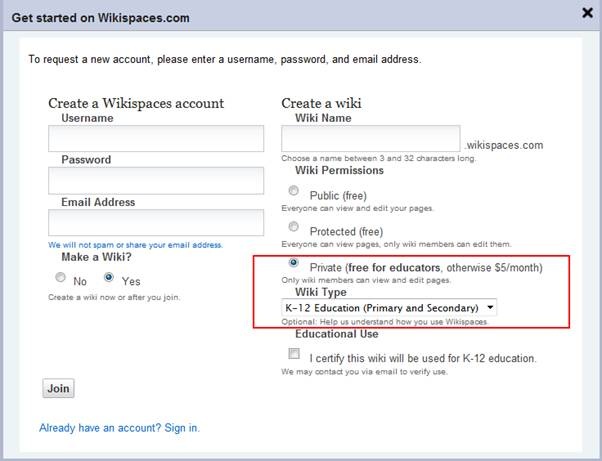
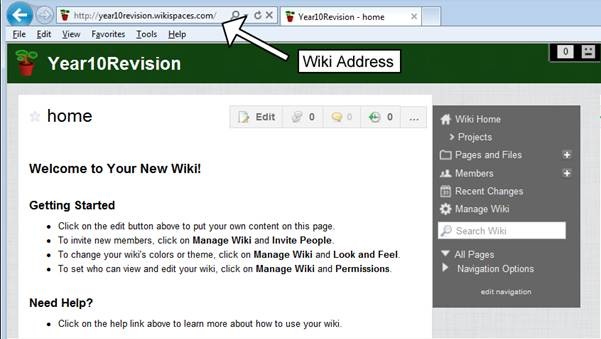
Before you start, you must sign-up for an account. All you need to sign up is a username, password and email address (preferably your school email address). Click here to sign up for an education account. Once you have created an account, you need to choose a name for your wikispaces web address. Once you have chosen a name for your site, you are ready to create your first wiki.
Step 2 – Creating a Classroom Wiki
Once you have created your wiki, you can immediately edit your first page. To edit the home page of your site, click on the ‘Edit’ button. When you have finished editing your home page, click on ‘Save’.
If you want help on editing your wiki page, check out Wikispaces video tours .
Step 3 – Adding extra functionality to your wiki
Wikispaces includes a number of useful widgets which you can embed into your site to improve the functinallity of your wiki. These include YouTube videos, RSS feeds, Google Calendar, facebook like button, google maps, polls and surveys. To add a widget to you wiki, click on ‘Edit’, to edit your page, and click on the ‘Embed Widget’ button (from the toolbar).
Use the Widget feature to embed interactive content into your wiki.
Step 4 – Setting permissions
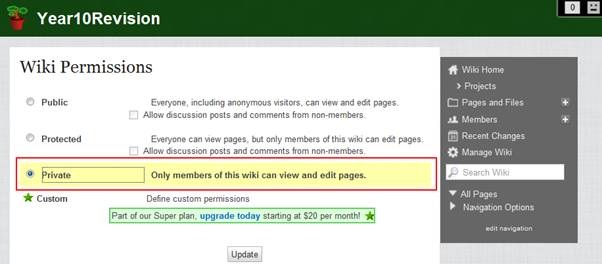
Once you have edited your first page, you must decide who can view or edit your wiki. Permissions can be set for the whole wiki and individual pages. To set the permissions for your wiki, click on ‘Manage Wiki’ and, under the people category, select ‘Permissions’.
You can choose from one of three options. You can allow everyone, including anonymous visitors, to view and edit your pages, allow everyone to view your pages but only allow members to edit your pages or you can allow only members to view and edit pages.
Step 5 – Invite people to your wiki
Once you’ve got your wiki customized and working, you’re going to want to share this collaborative space with other people.
To invite people to view / edit your wiki, click on ‘Manage Wiki’ and ‘Invite People’ to send an invitation email to the people who will be contributing to your wiki. You can type in up to 100 email addresses or Wikispaces usernames, separated by commas or line breaks, and click ‘Send’.
When visitors like your wiki, they can use the ‘Join’ link to request membership. You’ll be able to approve or deny these requests at ‘Manage Wiki’ and ‘Members’.
Adding bulk users
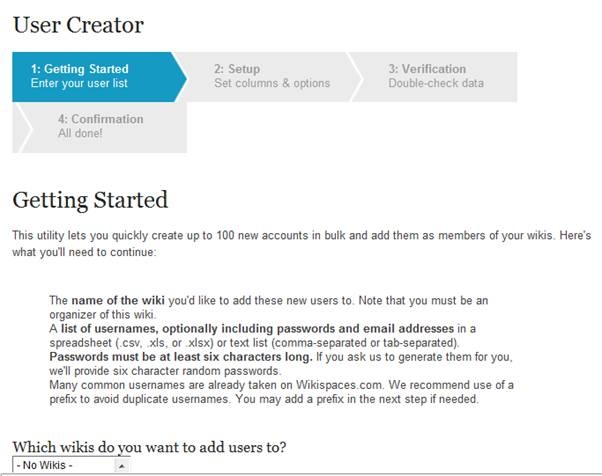
As well as inviting members to join your wiki, Wikispaces also provides teachers the facility to add bulk members (upto 100) via a .csv file. This is great for adding students who do not have a school email address. To add members using a .csv file, click on ‘Manage Wiki’ and, under ‘People’, click on ‘User Creator’.
Tutorial videos
How to create a wiki
This is a quick tutorial that covers how to setup and edit a page in a Wikispaces wiki.
Wikis in Plain English
A short explanation of wikis and how they can be used to coordinate a group.
