Minecraft coding tutorials: Pixel Art
In this tutorial, you will learn how to create Pixel Art in Minecraft using Microsoft MakeCode.
You may also want to try:
NEW Minecraft Pixel Painter - Create custom Minecraft pixel art easily with the MC Pixel Art Painter. Design your artwork, adjust settings, and generate JavaScript code for Minecraft Education Edition in just a few clicks. Click here
NEW Minecraft Pixel Painter - Create custom Minecraft pixel art easily with the MC Pixel Art Painter. Design your artwork, adjust settings, and generate JavaScript code for Minecraft Education Edition in just a few clicks. Click here
Part 1
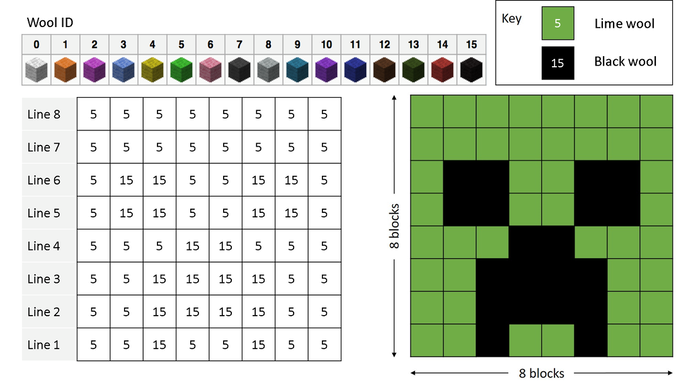
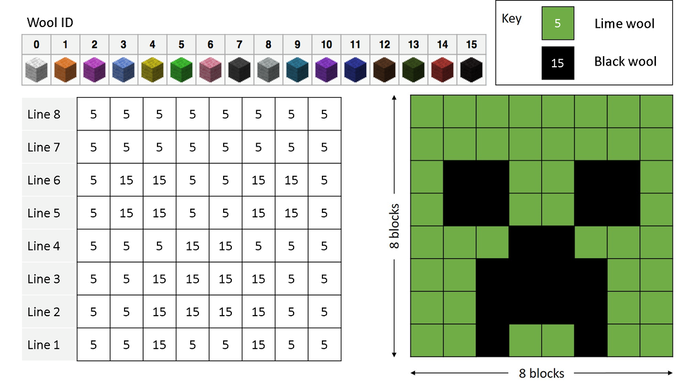
Creeper template.
1. Launch the Microsoft 'MakeCode' editor and create a new project.
2. Select the 'PLAYER' tab (A). Click and drag the 'on chat command' block (B) onto a blank canvas and change the text option to 'creeper' (see image below).
2. Select the 'PLAYER' tab (A). Click and drag the 'on chat command' block (B) onto a blank canvas and change the text option to 'creeper' (see image below).
3. Click on 'ADVANCED' (C). Select the 'BUILDER' tab (D). Click and drag the 'builder teleport to' block (E) and attach it to the 'creeper' block (see image below).
4. Select the 'PLAYER' tab (F). Click and drag the 'player world position' block (G) and attach it to the 'builder teleport to' coordinates (see image below).
5. Next, let's move the builder forward.
Select the 'BUILDER' tab (I). Click and drag the 'builder move' block (J) and attach it to the 'builder teleport to' block. Change the forward value to '10' (see image below).
Select the 'BUILDER' tab (I). Click and drag the 'builder move' block (J) and attach it to the 'builder teleport to' block. Change the forward value to '10' (see image below).
6. Next, let's set the builder's origin. This will allow us to teleport the builder back to the starting position (origin) after printing each line of blocks.
7. Next, let's create a new variable to store each line number.
Select the 'VARIABLE' tab (M). Click on 'Make a Variable'. Call the new variable 'lineNumber' and click 'OK'.
Select the 'VARIABLE' tab (M). Click on 'Make a Variable'. Call the new variable 'lineNumber' and click 'OK'.
8. Select the 'VARIABLE' tab. Click and drag the 'lineNumber' block (O) and attach it to the 'builder set origin' block. Change the lineNumber '1' (see image below).
9. Next, let's add our first line of pixels (blocks). We will use an array to store each line of blocks.
Click on 'ADVANCED' (P). Select the 'ARRAYS' tab (Q). Click and drag the 'set list to' block (R) and attach it to the end of your code.
Add the values inside your array for your first line of pixels.
Click on 'ADVANCED' (P). Select the 'ARRAYS' tab (Q). Click and drag the 'set list to' block (R) and attach it to the end of your code.
Add the values inside your array for your first line of pixels.
Part 2
10. Next, let's create a function to print our blocks (pixel art).
Click on 'ADVANCED' (S). Select the 'FUNCTIONS' tab (T). Click on 'Make a Function...' block (U).
Name the new function 'pixelArt' and click 'Done'.
Click on 'ADVANCED' (S). Select the 'FUNCTIONS' tab (T). Click on 'Make a Function...' block (U).
Name the new function 'pixelArt' and click 'Done'.
11. Next, let's add a for loop to place each block in our array.
Click on the 'Loops' tab (V). Select the 'for index from 0 to 4' (W) block and drag it inside your function.
Our array contains 8 slots but, because our for loop starts at 0 instead of 1, we need to set our for loop to 'from 0 to 7'. (see below)
Click on the 'Loops' tab (V). Select the 'for index from 0 to 4' (W) block and drag it inside your function.
Our array contains 8 slots but, because our for loop starts at 0 instead of 1, we need to set our for loop to 'from 0 to 7'. (see below)
12. Next, let's place our block builder.
Select the 'ADVANCED' tab. Click on 'BUILDER' (X). Select and drag the 'builder move forward by (1)' block and place it inside the 'for loop' block.
Change 'forward' to 'right' (see image below).
Select the 'ADVANCED' tab. Click on 'BUILDER' (X). Select and drag the 'builder move forward by (1)' block and place it inside the 'for loop' block.
Change 'forward' to 'right' (see image below).
13. Select the 'ADVANCED' tab and click on 'BUILDER'. Click and drag the 'place' block (Z) and place it inside the for loop.
14. Select the 'BLOCKS' tab. Click and drag the 'with data' block and place it inside the place block (see image below).
17. Next, change the block type to 'Wool' (see image below).
16. Next, lets use our array to tell the place block which colour wool to place.
Click on 'ADVANCED' (2) and select 'ARRAYS' (3). Select the 'list get value at' block (4) and place it inside the data value (see image below).
Click on 'ADVANCED' (2) and select 'ARRAYS' (3). Select the 'list get value at' block (4) and place it inside the data value (see image below).
17. Click on 'VARIABLES'. Select the 'index' block (3) and place it inside the 'get value at (0)' placeholder (see image below).
18. Next, lets tell the builder to go back to the start at the end of each line.
Click on 'ADVANCED' and select 'BUILDER'. Select the 'builder teleport to origin' block (6) and place it below the for loop (see image below).
Click on 'ADVANCED' and select 'BUILDER'. Select the 'builder teleport to origin' block (6) and place it below the for loop (see image below).
19. Next, let's tell the builder to go to the next line.
Click on 'ADVANCED' and select 'BUILDER'. Select the 'builder move forward by' block (6) and place it at the end of your code.
Change forward to 'up' (see image below).
Click on 'ADVANCED' and select 'BUILDER'. Select the 'builder move forward by' block (6) and place it at the end of your code.
Change forward to 'up' (see image below).
20. Click on 'VARIABLES. Select 'lineNumber' (8) and place it inside the builder move up block (see image below).
21. Finally, let's add the line of code to call our new function.
Click on the 'ADVANCED' tab (9) and select 'FUNCTIONS' (10). Select the 'call pixelArt' block and place it beneath the array for line 1.
Click on the 'ADVANCED' tab (9) and select 'FUNCTIONS' (10). Select the 'call pixelArt' block and place it beneath the array for line 1.
Your code should look something like this:
Part 3
21. Finish coding your Pixel Art Creeper by adding the following lines:
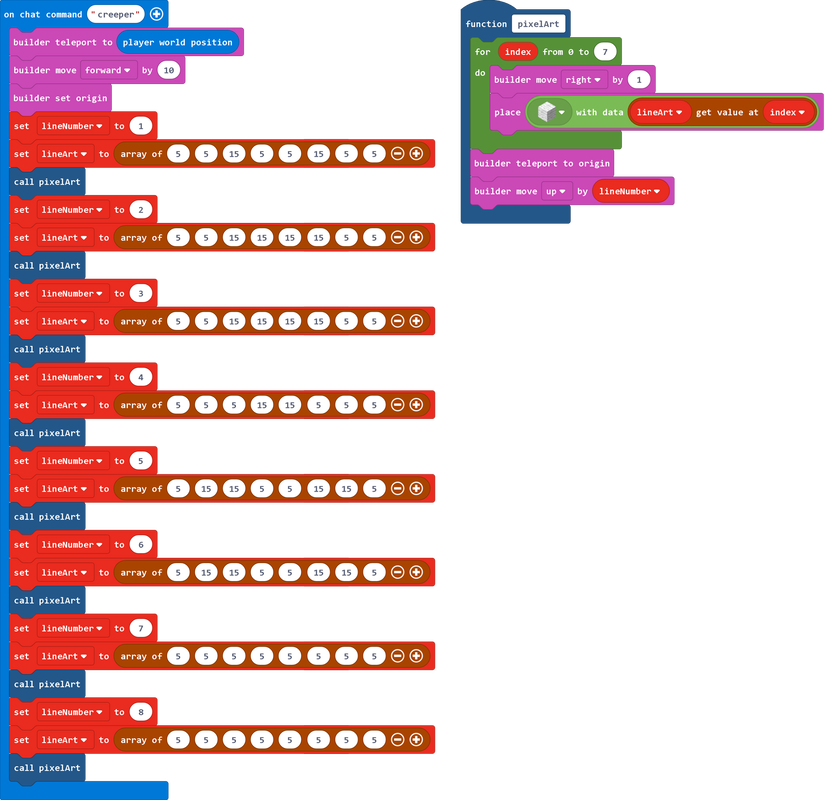
Your finished code should look like this:
22. Open Minecraft and click on 't' top open the chat window.
23. Type in 'creeper' in the command line (followed by the Enter key) to run your code.
23. Type in 'creeper' in the command line (followed by the Enter key) to run your code.
Creeper Pixel Art
Resources
| minecraft-creeper.mkcd |
Creeper Pixel Art source code.
Challenge 2
Try improving your Creeper Pixel Art by adding more colours. For example:
Challenge 3
Have a go at coding your own Pixel Art work. Here's an example of what is possible:
Pikachu Pixel Art created entirely out of code.
You may also be interested in:
This work is not affiliated in any way with Mojang AB. Minecraft is a trademark of Mojang AB. The Minecraft Name, the Minecraft Brand and the Minecraft Assets are all property of Mojang AB or their respectful owner. This work adheres to the terms set out by Mojang AB at https://www.minecraft.net/terms
This work is not affiliated in any way with Mojang AB. Minecraft is a trademark of Mojang AB. The Minecraft Name, the Minecraft Brand and the Minecraft Assets are all property of Mojang AB or their respectful owner. This work adheres to the terms set out by Mojang AB at https://www.minecraft.net/terms


