Micro:bit Physical computing guides
No. 7: RGB LEDs
Connecting an LED to a micro:bit
Instructions on how to attach an RGB LED to a BBC micro:bit.
What you will need
Instructions on how to attach an RGB LED to a BBC micro:bit.
What you will need
- BBC micro:bit
- Micro USB cable
- Battery pack with 2 x AAA batteries
- 1 x RGB LED
- Selection of resistors
- 4 x Crocodile clip leads
|
Understanding RGB LEDs
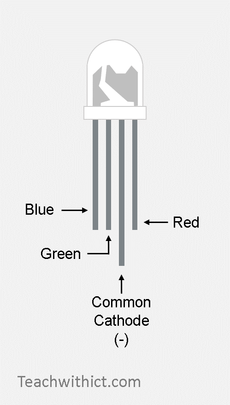
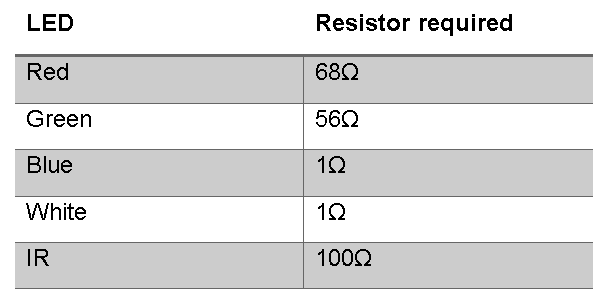
An RGB LED has four legs: 3 short legs (anodes) – 1 for each of the 3 component colours (Red, Green and Blue) and 1 long leg (common cathode). Each of the colours (Red, Green and Blue) can be made my supplying a small current to each of the corresponding pins. Understanding Resistors A resistor is required to limit the power supplied to an LED. Without it, the LED could blow. Resistors come in a variety of shapes and sizes however, fortunately for us, there is an easy way to find out which resistor we need! With Ohm’s Law, it is possible to calculate the resistor required for each type of LED. Typically, the following resistors can be used with each type of LED: |
Kitronik provide a handy resistor value calculator https://www.kitronik.co.uk/blog/led-resistor-value-calculator/ to help you choose the right resistor for your project.
Choosing the right resistors
It doesn’t really matter what resistors you use as long as it meets the minimum requirements for each type of LED (see table above). What resistor you use also depends on what resistors you have to hand. In the example below, I’ve used a 68Ω for each pin as these meet the minimum requirements for each colour (Red = 68Ω, Green = 56Ω, Blue = 1Ω). Note: Whilst it’s possible to use a higher value resistor than the ones in the table, doing so may likely cause your RGB LED to appear slightly dimmer.
Wiring instructions
- Disconnect the micro:bit from your computer and disconnect the battery pack.
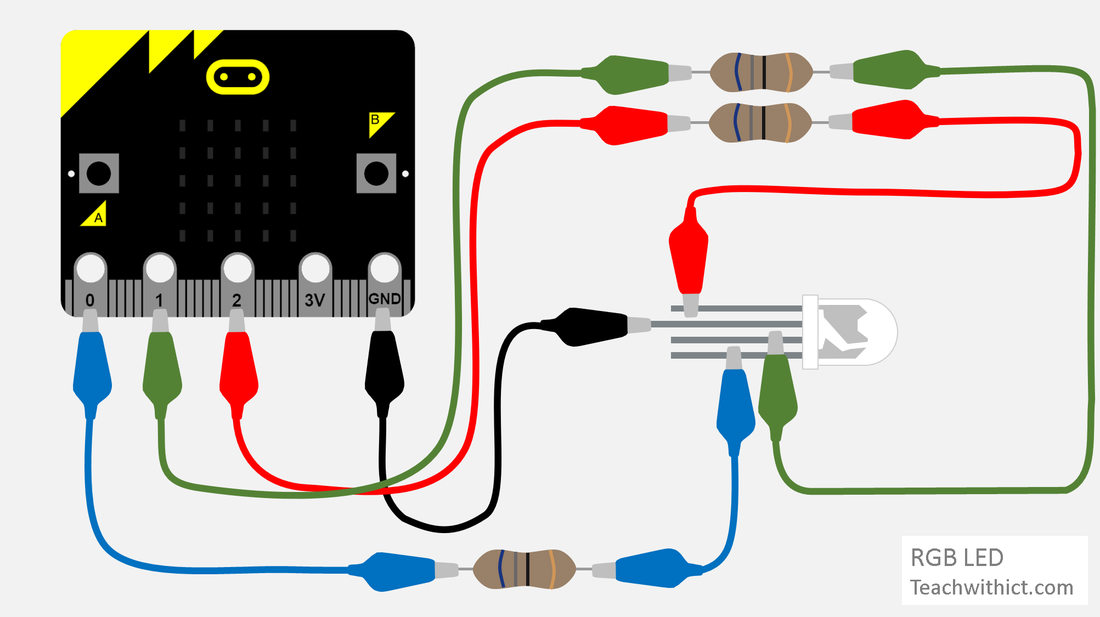
- Use a crocodile clip to connect the short (Anode) Blue leg of your LED to either end of your 1st resistor (1Ω or above). Connect another crocodile clip from the other end of your 1st resistor to Pin 0 on your micro:bit.
- Use a crocodile clip to connect the short (Anode) Green leg of your LED to either end of your 2nd resistor (56Ω or above). Connect another crocodile clip from the other end of your 2nd resistor to Pin 1 on your micro:bit.
- Use a crocodile clip to connect the short (Anode) Red leg of your LED to either end of your final resistor (68Ω or above). Connect another crocodile clip from the other end of your final resistor to Pin 2 on your micro:bit.
- Connect a crocodile clip to the long (Common Cathode) leg of your LED and attach it to GND.
Programming your LED
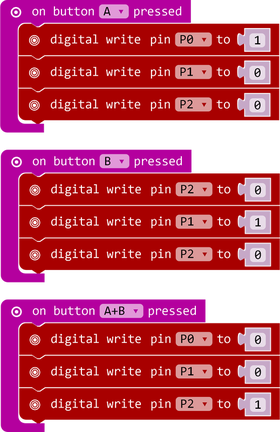
Copy the below:
Programming your LED
Copy the below:
Testing your code
Testing your code
- Download your program to your micro:bit.
- Reconnect your battery and run your program.

